
Creating a QR + Card Reader Campaign
What this campaign type does
A QR + Card Reader campaign is one donation page that works in two ways:
- In person, in our mobile app ("GiveTap Payments" on the App Store or Google Play).
- Online, through our fast QR donation flow, which donors open by scanning a QR code or NFC tag, or by typing a short URL.
The mobile app works with these devices:
- Stripe S700 and S710
- Stripe BBPOS WisePad 3
- Stripe Tap to Pay on Android or iPhone
- Square Reader
In the app, donors can pay by card (contactless or chip and PIN) or with a wallet on a phone or watch. To get a card reader, see Hiring or buying a card reader and setting up an S700 or S710.
The QR donation flow is very flexible. Charities often put our QR codes:
- on collection tins
- in meetings or faith services
- on tables at gala dinners
- on signs in public places
- in email footers.
The flow is built to be fast, aiming for under 20 seconds. By default it asks for very little typing. The idea is to secure the donation first, then collect Gift Aid and opt-in details afterwards, so fewer donors drop out.
You can also offer monthly giving on these campaigns. See Monthly donations.
Who it's for: charity staff with Editor or Administrator access who want to collect donations by QR code, card reader or Tap to Pay.
Find your campaigns
In the side menu, go to QR + Card Reader and then Campaigns. The list shows each campaign's views, total donations, views to donation rate, donation value, Gift Aid value and the date it was created.
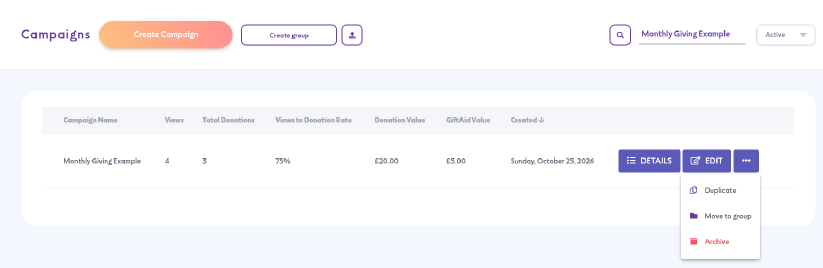
- Use the search box to find a campaign, and the Active / Archived menu to see archived ones.
- DETAILS opens the campaign's details page and QR codes. EDIT opens the campaign settings.
- The … menu lets you Duplicate a campaign, Move to group or Archive it.
- Create group and the upload button let you organise campaigns into groups. See Organising campaigns into campaign groups.
Create a campaign: quick steps
- Go to QR + Card Reader > Campaigns and click Create Campaign.
- General: add a campaign name, colours, a header image and a logo.
- Info (optional): turn on an extra page before the donation step.
- Donation: add header text and your donation amounts, and choose the default amount.
- Gift Aid: leave Gift Aid on, or turn it off if you don't claim it.
- Thank You, Email, Email Thank You, Pledges and Email Receipt (optional): set what donors see and receive after they give.
- Check every required field (marked *) is filled in, then click Create campaign.
- Your campaign starts with one QR code. You can generate more from its details page.
Each section is explained below.
How the form works
Everything is on one page called Create a new campaign. The settings are split into sections that open and close: General, Info, Donation, Gift Aid, Thank You, Email, Pledges and Email Receipt. An extra Email Thank You section appears when you turn on Collect Emails.
Most sections match a page in the donor's journey. General changes every page, for example the colours and header image. As you make changes, the phone preview on the right updates straight away. It shows roughly what a donor sees on their phone.
To change a campaign later, click EDIT, make your changes and click Save updated campaign.
1. General
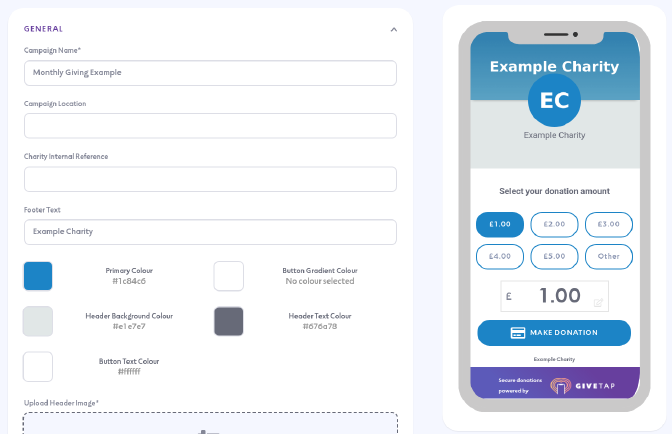
- Campaign Name (required): a name to help you find the campaign, for example 'Gala Dinner October 2026'.
- Campaign Location: a place to link the campaign to. It can be as specific as you like, or 'National'.
- Charity Internal Reference: an optional reference that appears in your CSV reports. You might use your CRM reference here.
- Footer Text: shown at the bottom of each page. Many charities add their charity or company number so donors can trust the page.
- Colours: set the Primary, Button Gradient, Header Background, Header Text and Button Text colours to match your branding.
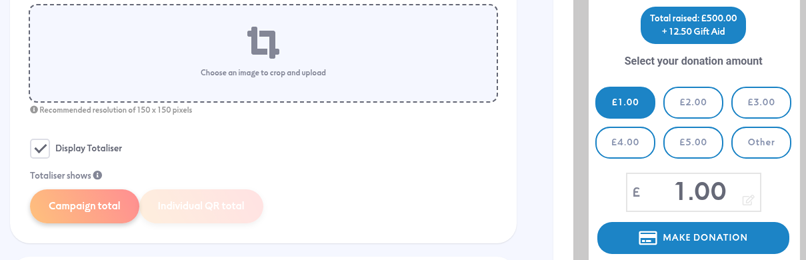
- Upload Header Image (required): we recommend 750 x 272 pixels. If your image is taller than this shape, it will be cropped to fit.
- Upload Logo Image (required): we recommend 150 x 150 pixels. The logo is cropped into a circle and shown just below the header image.
- Display Totaliser: tick this to show how much has been raised. Under Totaliser shows, choose Campaign total (the default) or Individual QR total. Donors see "Total raised: £X + £Y Gift Aid" above the donation heading.
2. Info (optional)
Turn on Info Page Enabled to add a page before the donor picks an amount. Donors see this page with a DONATE NOW button. When it's off, donors go straight to the donation page.
When it's on, you can set:
- Title Text (required) and Subtitle Text.
- Video URL: a YouTube or Vimeo link.
- Upload Image: we recommend 500 x 250 pixels.
- Extra fields: First name, Last name and Email. Each has its own toggle, and they're all off by default.
- Button Text and Button URL.
This page only shows in the online QR donation flow, not in the mobile app.
3. Donation
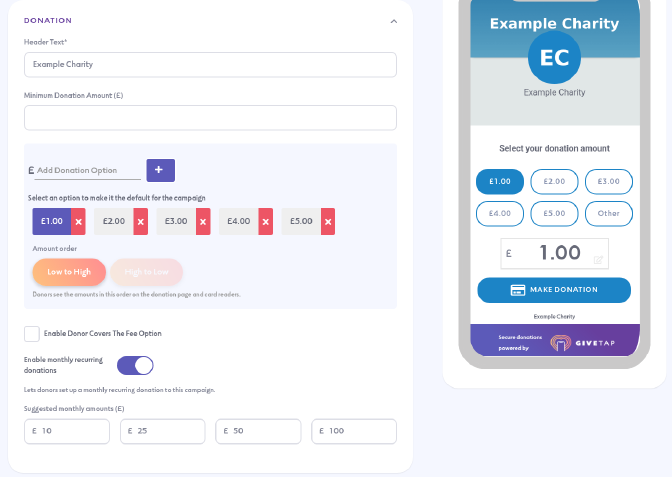
- Add Header Text (required). This is the message donors see at the top of the donation page.
- Type an amount in Add Donation Option and click +. Repeat for each quick amount you want. Click the x on an amount to remove it.
- Click an amount to make it the default. The default is highlighted when the donor opens the page.
-
Under Amount order, choose Low to High or High to Low. Donors see the amounts in this order on the donation page and card readers.
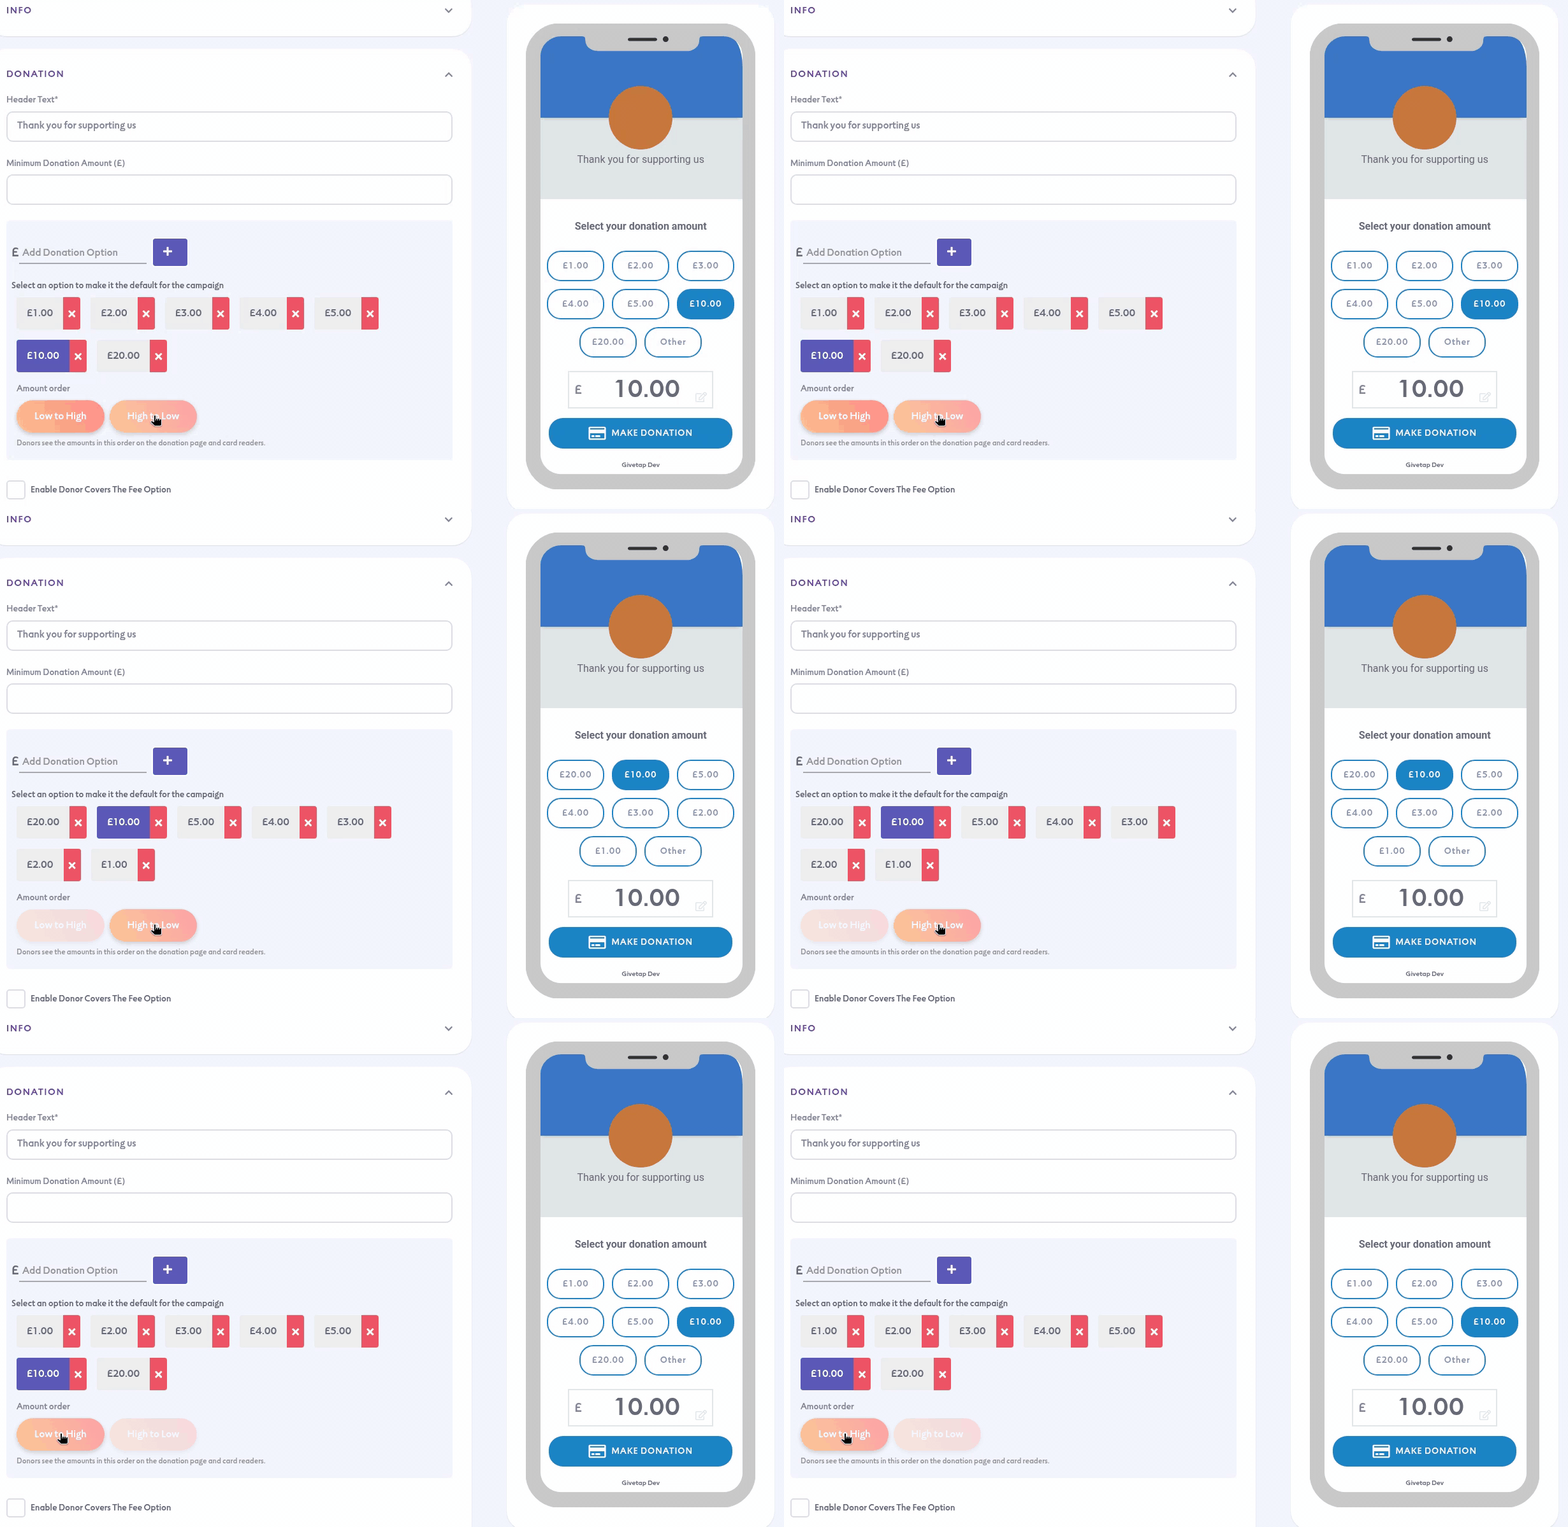
- If you want a higher minimum, enter it in Minimum Donation Amount (£). The lowest a donor can give is £1, which is set by the payment providers.
- Optional: tick Enable Donor Covers The Fee Option. See Donor covers the fee.
- Optional: turn on Enable monthly recurring donations. Then fill in the 4 Suggested monthly amounts (£). See Monthly donations.
Donors can also type their own amount, up to £999,999.99.
4. Gift Aid
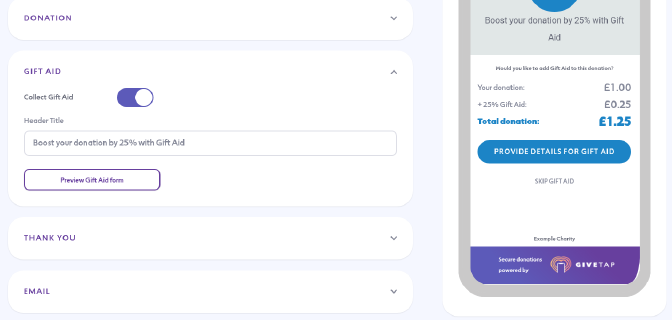
Collect Gift Aid is on by default. Donors are shown how much Gift Aid adds (+25%) and can add their details. If your organisation isn't a charity or doesn't claim Gift Aid, turn it off.
You can change the Header Title and click Preview Gift Aid form to see the form. The form tries to fill in any details the donor already gave when paying through Stripe or Square.
5. Thank You
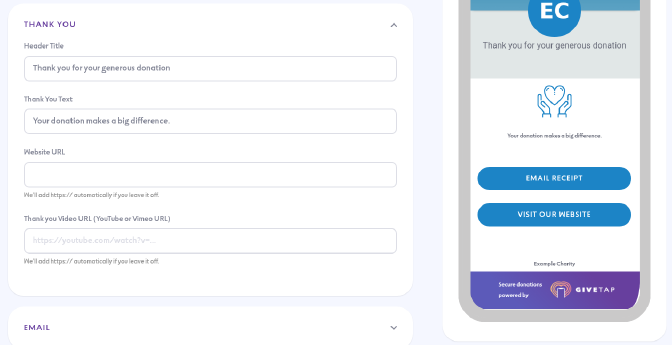
- Header Title and Thank You Text: the message donors see after giving.
- Website URL: adds a 'Visit our website' button. We add https:// for you if you leave it off.
- Thank you Video URL: a YouTube or Vimeo link to show a video on this page.
6. Email (optional)
Turn on Collect Emails to invite donors to join your mailing list.
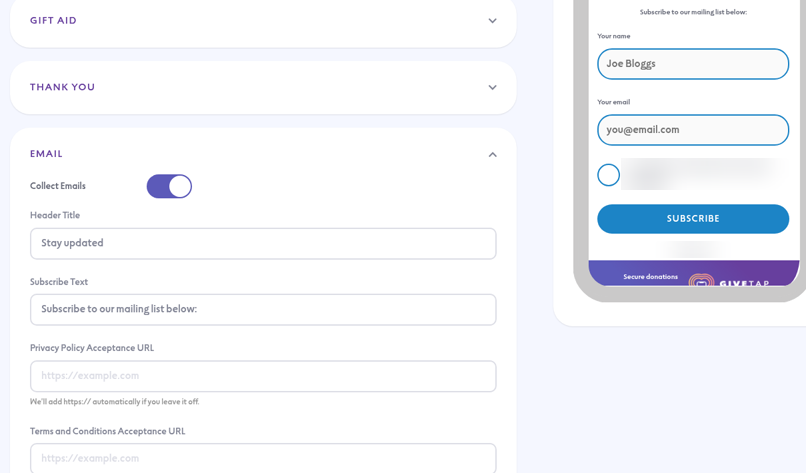
You can set:
- Header Title: "Stay updated" by default.
- Subscribe Text: the message above the form.
- Privacy Policy Acceptance URL and Terms and Conditions Acceptance URL, for example https://www.yourcharity.org.uk/privacy-policy.
Donors see a name field, an email field, a tickbox to subscribe to your mailing list and a SUBSCRIBE button. GiveTap stores the emails, and you can export them from Reports.
Email Thank You
This section only appears when Collect Emails is on. It sets the page donors see after they subscribe:
- Header Title: "Thank you for subscribing!" by default.
- Completion Text: your message to new subscribers.
- Website URL: adds a VISIT OUR WEBSITE button.
7. Pledges (optional)
Turn on Enable Pledges Page to create animated pledge moments, which work well at gala events. You can add a logo (150 x 150 pixels), pick an animation shape, set the colours and turn on a totaliser. For the full steps, see Animated pledge page.
8. Email Receipt
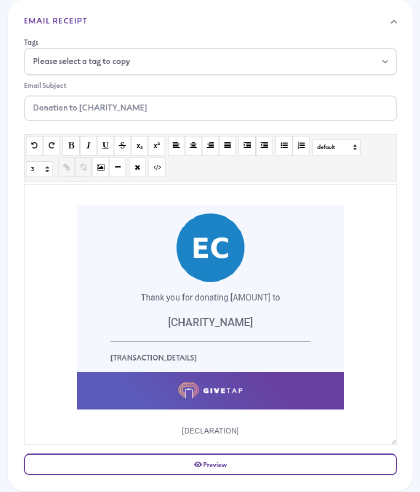
This is the receipt email donors get. You can change the Email Subject and the body. Pick a tag from the Tags list to copy it, then paste it where you want it. The tags are:
- [CHARITY_NAME]
- [TITLE]
- [AMOUNT]
- [TRANSACTION_DETAILS]
- [DECLARATION]
Click Preview to check the email. When you're happy with every section, click Create campaign.
After you create it: the details page and QR codes
Click DETAILS next to the campaign to open its details page.
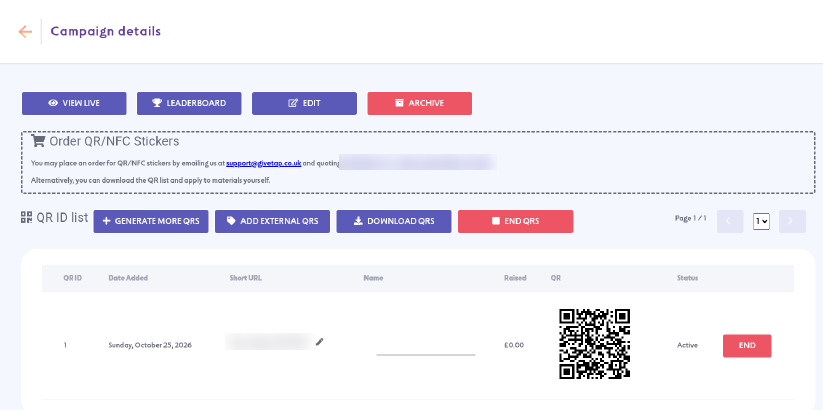
- VIEW LIVE opens the donation page. LEADERBOARD shows the campaign's leaderboard. EDIT opens the settings. ARCHIVE archives the campaign.
- Order QR/NFC Stickers: email support@givetap.co.uk quoting the campaign ID shown in this box. Or download your QR codes and add them to your own materials.
Generate more QR codes
Every campaign starts with one QR code. Click GENERATE MORE QRS, enter how many you need and click GENERATE. You can make up to 1,000 per campaign in the portal. If you need more, email support@givetap.co.uk and we'll generate them for you.
Each QR code gets its own ID number for that campaign, starting from 1. The table shows each code's ID, date added, short URL, name, amount raised, the QR image and its status. For reporting, you can edit each code's Name and its Short URL, which people can type to reach the donation page.
Add external QR codes
If another company printed your QR codes or NFC tags, click ADD EXTERNAL QRS to register them. See Adding external QR codes.
Download QR codes
Click DOWNLOAD QRS, then DOWNLOAD. You get a zip file. Unzip it to find your QR codes as PNG images, plus a CSV file listing each code's ID, name, file name and URL.
End QR codes
Ending a QR code stops any more donations through it. Click END next to a single code, or END QRS at the top to end them all. The Status column shows whether each code is Active or Ended.
For full step-by-step help, see Generate QR codes.
Troubleshooting
- I can't create the campaign. Check the required fields (marked *) are filled in: Campaign Name, header image, logo and Header Text in Donation.
- My header image looks cut off. It's cropped to fit. Use an image of about 750 x 272 pixels.
- Donors skip my info page. Check Info Page Enabled is turned on.
- Amounts show in the wrong order on the card reader. Change Amount order in the Donation section and save.
- A QR code no longer takes donations. Check its Status. If it says Ended, it can't take donations.
- I can't find an old campaign. Switch the menu at the top right of the Campaigns list from Active to Archived.
- I need more than 1,000 QR codes. Email support@givetap.co.uk.